
Just a follow up to the recent blog on what to wear when winter mountaineering. It is just as important what you would put inside your rucksack.
Rucksack
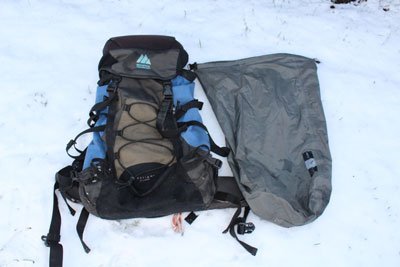 Let’s start with the bag. You should have a larger and sturdier rucksack than what you would use in summer. The recommended size would be between 45 and 60 litres. It sounds like a lot but it isn’t and it’s always best to have a too large bag than too small. The more basic it is the better. All the bag needs is a large main compartment, a lid with another small compartment, compression straps and small but sturdy pockets below the compression straps. Try not to go for rucksacks with meshed side pockets. Neat idea to keep the weight down but they rip in no time. Ice axe looks are not necessary if you have to compression straps and I would actually advise not to use them if you have the loops. Instead use the compression straps and the side pocket to store your ice axe. This is safer for anyone walking behind your and the axe is easier to access.
Additionally I would advise a dry bag liner for your dry kit. This way you can create a dry zone and a wet zone in your bag and keep the dry kit dry.
- 45-60 litre rucksack
- Large dry bag
Navigation
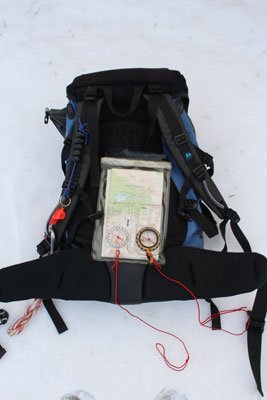 Just like in summer it’s good to have your navigation gear with you. The obvious ones are Compass and map. You should always have a map of the area you walk in with you. In winter the best choice are 1:50k OS Landranger maps. The 1:25k maps tent to have too much detail and are more confusing than helping. Since the terrain is usually covered in snow, all you need is the contour lines, distances, rivers and lochs (or lakes south of the border). To protect the map you should always put it inside a map case. Over years I have seen many different types of map cases but the only ones that really cut it are from Ortlieb and any other, that are of similar design. Cheaper ones don’t last nearly as long and for a few quid more you get a much better lasting map case. In winter I would also advise the A5 size and not the full map case. This makes it a smaller pack size and will easily hide, ready to use inside your jacket pocket. To get back to the compass, you should always have a functional compass with roamer scale and measuring scales. Best choices to do the job are the Silva Expedition (with clinometer and magnetic variation) or Silva Expedition Type 4. However you get now similar from other manufacturers. I would also advise to have 2 compasses with you. They are pretty bomb proof but what do you do if one decides to depolarise while stored next to your mobile or camera? Last not least you should have a stop watch to time your legs and another good aid are spring toggles attached to the rucksack strap to count 100m (like seen on the photo).
- Compass
- 1:50k map
- Waterproof map case
Spare clothing
 Now spare clothing can help you stay warm when you stop. Pretty good are belay jackets. They are very light, have good insulation and tend to work even when wet (unlike down jackets). Also some hats and a balaclava to keep your head warm. The human body loses more heat through the head than any other part. Also have plenty of gloves. In the photo you see 2 pair of thin gloves for nicer conditions and 2 pair of thick leather gloves. Rather have too many than not enough. Getting cold usually starts at the extremities. Also but not on the photo you should have ski goggles and sunglasses in the bag.
- Belay jacket
- Hat
- Balaclava
- 2 pair thick gloves
- 2 pair thin gloves
- Ski goggles
- Sun glasses
Ice axe and Crampons
 Those are the obvious winter tools, your ice axe being the number one tool. In the past ice axes where picked by measuring the distance from your hand, the top of the boots. This is nowadays to be considered too long by professionals. However it is still a personal choice. I would advise a length of 45-60cm depending on your height. Having a shorter ice axe allows you to use it on steeper ground in a comfortable position while when they are too long the arm could be too far up the slope and stretched out.
With crampons it all depends on what footwear you choose. I tend to advise people on stiffer B2 or B3 boots. I have seen B1 boots to bend when walking on harder snow. Below is a table for fitting crampons on boots. The easiest to fit tend to be C2 and C3.
| Crampons | ||||
| C1 | C2 | C3 | ||
| Boots | B1 | √ | ||
| B2 | √ | √ | ||
| B3 | √ | √ | √ | |
- B2 or B3 Boots
- Fitting crampons
Safety and group equipment
Often overlooked are safety and group equipment. When walking in the mountains in winter it can get pretty cold and windy. By having a group shelter (red bag in photo) you can hide from the elements. The first aid kit goes without saying and so does the head torch. The helmet is a personal choice. But think about that, most fatal injuries in the mountains are head injuries!
The snow shovel, avalanche probe and snow saw are in case you need to rescue someone from an avalanche. The shovel can also help you to build a quick shelter too.
- Group shelter
- First aid kit
- Head torch
- Climbing helmet
- Snow shovel
- Avalanche probe
- Snow saw
Food and drink
Last not least, you have to take some food and drink with you. Essential is a thermos flask with a hot drink. Think about what you put in there. Coffee has no nutritional value at all but something like hot Ribina can give you a bit of a sugar boost. Food should be slow release energy, complex carbs. So something like bananas, sandwiches and for a boost choccie bar.
- Hot drink
- Nutritional food
- Chocolate bar